WRINKLES
SKIN QUALITY
MEDICAL MICRONEEDLING
A practical approach to facial lines, texture and skin quality. Assess wrinkle type, plan a treatment series and adapt medical mechanical microneedling to each facial zone.
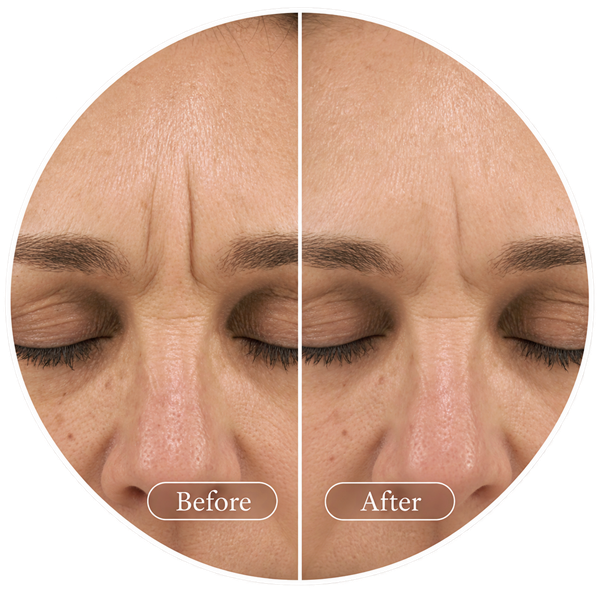

Softer Facial Lines
Less noticeable lines

Smoother Skin Texture
Improved surface quality

Improved Skin Quality
More uniform appearance

Progressive Improvement
Results build gradually
Different wrinkle drivers. Different treatment decisions.
Static lines and fine creases
Assess lines at rest and during expression. For fine surface rhytides accompanied by uneven texture, focus on gradual improvement in skin quality and line appearance. Document the depth, direction and severity of each target area before treatment. [1]
Dynamic expression lines
Forehead, glabellar and lateral eye lines may have a strong muscular component. Identify what remains visible at rest. Microneedling supports skin remodeling; it does not relax facial muscles. Consider an appropriate muscle-directed treatment when movement is the main driver. [1,4]
Deep folds and volume loss
Assess nasolabial folds, marionette lines and laxity in the context of facial support and volume. Surface treatment alone may leave a substantial structural fold. Discuss volume correction or other suitable procedures when the main concern lies deeper than skin texture. [1,5]
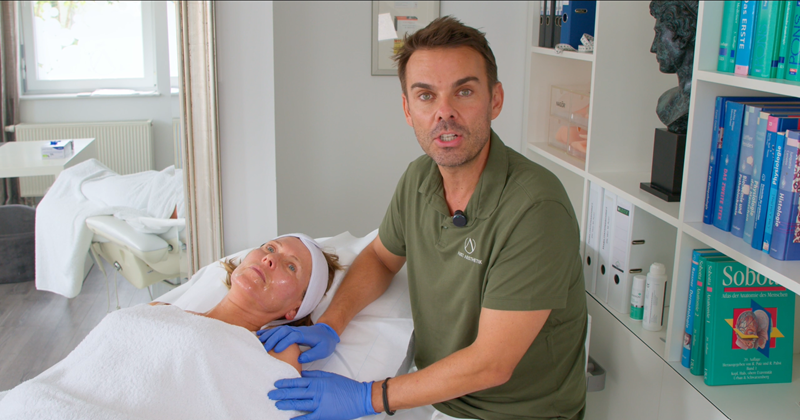
Medical Microneedling for Wrinkles & Skin Rejuvenation
Patient selection, needle depth, treatment techniques and clinical endpoints.
See skin rejuvenation in practice.
Watch PD Dr. med. Matthias Aust demonstrate facial medical microneedling, explaining treatment settings, technique adjustments across facial areas and how to achieve controlled tissue stimulation.
Who benefits from medical microneedling?
Understand how microneedling addresses skin texture, enlarged pores and overall skin quality, and where its limitations lie.
How do you optimize treatment techniques?
Explore needle depth adjustments from 1.0 to 1.5 mm, continuous movements and safe techniques around delicate facial areas.
When is the clinical endpoint reached?
See how pinpoint bleeding guides needle depth, pressure and treatment coverage while helping avoid unnecessary skin trauma.
Complete the form to watch the expert video.
A repeatable procedure and follow-up framework.
Screen before starting the series
Confirm that the skin, medical history and treatment goal are suitable before choosing settings.
Review active acne, infection, inflammatory skin disease, healing problems, keloid tendency, diabetes control, allergies and relevant medication. Record recent injectables and previous resurfacing. Defer treatment over active lesions and resolve contraindications first. [1,3]
Make the first consultation count
Agree on a measurable target and explain likely recovery. For recurrent herpes labialis, consider antiviral prophylaxis when clinically indicated. Medication changes require the prescribing clinician; do not ask patients to stop anticoagulants independently. [1,3]
Microneedling for facial wrinkles
Plan a structured series, adapt each appointment to skin recovery and allow time for progressive remodeling.
A four-session pathway can be planned at approximately 30-day intervals: Days 0, 30, 60 and 90. Reassess healing before each visit and postpone when the skin has not recovered. Schedule a later comparison around Day 150, approximately two months after the fourth treatment. [1]
Allocate time for the whole appointment
Include reassessment, photography, preparation, treatment and aftercare. Topical anesthesia may require around 30 minutes depending on the product and clinical assessment. Set treatment time according to the area and tissue response; there is no single verified whole-face treatment duration for this pathway. [1]
Protect the eyes, prepare the skin and cartridge
Build a consistent preparation sequence for each patient individually before the first pass.
Cleanse the face. If appropriate, apply a suitable topical anesthetic within its dose, area and exposure limits; remove it completely before antisepsis. Use an antiseptic suitable for the facial zone, protect the eyes and allow the skin to dry. Open a new sterile, single-use cartridge for every session. [1,3]
Control glide and skin contact
Use only a sterile glide product permitted by the current device instructions. Do not assume cosmetic serums, PRP or other products are suitable for delivery through microneedling channels. Keep used components separate from the clean field. [3]
Separate depth, speed and tissue response
Choose settings for the actual device and facial zone, then document what was used.
The Exceed configuration described in reference [1] offers a 0–1.5 mm needle adjustment and a 100–150 Hz stroke-frequency range. These are device capabilities, not a fixed prescription. Select the frequency within the current IFU and training; no single wrinkle-specific Hz setting is established here.
Use the endpoint to control exposure
Use controlled, even movement with the permitted technique; circular movement is one documented approach. Monitor erythema, patient tolerance and pinpoint bleeding. Do not keep treating to intensify bleeding. Stop and reassess unexpected pain, skin trauma or an excessive reaction. A fixed pass count is not specified for this pathway. [1]
Plan by zone, not by one whole-face depth.
Adapt the setting to the tissue
Use the ranges below as reference limits for planning, not automatic starting depths. [1]
Assess skin thickness, tissue support and tolerance in each zone. The setting describes needle protrusion and does not guarantee the same penetration in every patient. Select the actual depth within the current Exceed IFU, permitted indication and training; use a shallower setting or omit an area when appropriate.
Keep device versions and indications distinct
Do not transfer these settings automatically to Exceed Unlimited or another device. For the U.S. Exceed wrinkle indication in K180778, the defined areas are glabellar frown lines, periorbital lines and cheek folds in adults aged 22 or older with Fitzpatrick I–III. Other listed zones are outside that specific U.S. wrinkle indication. Regional labeling takes priority. [2]
Medical Microneedling: Clinical Insights, Techniques & Outcomes | PD Dr. Matthias Aust
From acne scars to stretch marks: patient selection, needle depth, treatment endpoints, safety, and realistic clinical expectations.
From clinical expertise to better treatment decisions.
Join PD Dr. med. Matthias Aust for an expert discussion on medical microneedling, combining clinical experience with practical treatment insights.
Why does the treatment mechanism matter?
Discover how mechanical microneedling differs from RF treatments and how controlled microinjury supports skin regeneration.
How do you know when to stop?
Explore needle depth, skin stretching, treatment techniques, and pinpoint bleeding as a clinical endpoint without overtreatment.
What really matters for safe, effective microneedling?
Learn why scientific evidence, device quality, professional training, and realistic patient expectations are essential for clinical success.
Match needle protrusion to facial anatomy.
Periorbital · 0.5–0.8 mm
Plan conservatively for thin tissue around the lateral eye area. Assess lines at rest and during smiling. Respect orbital anatomy and the permitted treatment boundary; this range is not an instruction to needle mobile eyelids or within the orbital rim.
Forehead · 0.7–1.0 mm
Account for thinner tissue over bone and the contribution of frontalis activity. Target the surface component and document expression consistently. This zone is outside the specific U.S. Exceed wrinkle indication described in [2].
Glabella · 0.7–1.3 mm
Differentiate an etched line at rest from a predominantly dynamic frown. Select the actual setting according to tissue thickness and response. Increasing depth does not address the muscular cause of expression lines.
Cheeks · 0.9–1.5 mm
Assess cheek-fold severity, skin thickness, laxity and volume loss separately. Treat the skin-quality component with even coverage. The upper end of the range is not a routine target for every cheek or every patient.
Upper lip · 0.7–1.0 mm
Assess fine vertical lines and herpes history. Stay within the permitted cutaneous treatment area and protect the lip margin and mucosa. This zone is outside the specific U.S. Exceed wrinkle indication described in [2].
Chin / jawline · 0.9–1.3 / 0.7–1.3 mm
Use separate settings for chin and jawline; account for bony contours and tissue thickness. Distinguish surface creases from loss of support. These zones are outside the specific U.S. Exceed wrinkle indication described in [2].
Six steps from assessment to follow-up.
01 · Map the target
Record static and dynamic components, facial zone, line severity, texture and laxity. Agree on the improvement the patient wants to see and whether microneedling can address that target. [1]
02 · Establish the baseline
Photograph the same views at rest and with a standardized expression. Keep lighting, camera distance and head position consistent. Use the same grading scale and document recent aesthetic treatments. [1]
03 · Prepare the field
Confirm suitability again on the treatment day. Complete cleansing, any appropriate anesthesia and antisepsis; let the skin dry. Check cartridge packaging and expiry before opening a new sterile cartridge. [1,3]
04 · Adjust by zone
Use the facial depth map as a planning reference and the current IFU as the operating limit. Record actual depth and frequency separately. Reassess thinner skin, bony areas and the periorbital boundary before continuing. [1]
05 · Deliver even coverage
Maintain controlled contact and a planned movement pattern. Monitor the skin response throughout treatment and avoid repeated aggressive passes over a single line. Record treated zones, settings, tolerance and any reaction. [1]
06 · Review after recovery
Provide written aftercare and a route for reporting concerns. Check recovery before the next session and repeat comparable photographs. Judge the result across the full series and at the delayed review. [1]
Support healing before assessing improvement.
Day 0 · Explain the response
Prepare patients for temporary redness, tenderness and mild swelling. Remove residual material gently and provide the clinic’s written aftercare instructions. Immediate redness or swelling does not show the final wrinkle response. [1]
First days · Protect the skin
Use gentle cleansing and suitable moisturizer according to the current instructions. Discuss sun avoidance and appropriate photoprotection. Give clear instructions on when normal skincare and makeup may resume; recovery varies with the area and intensity. [1,3]
If symptoms worsen · Review promptly
Increasing pain, spreading redness, discharge, fever or a cold-sore outbreak warrant prompt clinical contact. Persistent reactions need assessment before another procedure. Give patients a clear contact route and escalation plan. [3]
Next session · Check recovery
Ask about pain, dryness, sensitivity and any delayed reaction. Inspect the skin before repeating treatment. Keep the approximate monthly rhythm only when recovery and the patient’s condition support it. [1]
Day 90 · Review the series
Compare line grade, skin texture and laxity with baseline under the same photographic conditions. Record both clinician assessment and patient perception; avoid scoring immediately after the procedure. [1]
Day 150 · Review the result
Reassess around 60 days after the fourth session to capture change beyond the active treatment period. Base any further treatment on residual concerns, documented response and tolerability rather than an automatic maintenance schedule. [1]
Measure the changes that matter to your patient.
Assess three outcomes separately
Track wrinkle severity, surface texture and laxity using the same method at every review.
At Day 150, reference mean improvements were 1.23 grades in global wrinkle score, 1.54 in texture and 1.09 in laxity. These are average changes on separate rating scales, not percentages or promised individual results. Use them to discuss the types of change to assess. [1]
Keep comparisons meaningful
The global wrinkle score combines nine facial regions. Grade individual target areas as well, so an overall score does not hide a limited response in one zone. Keep the patient’s report distinct from the clinician’s rating. [1]
Look beyond a single before-and-after image
Follow fine lines, surface smoothness and the patient’s experience over the same timeline.
Compare photographs with matching lighting, expression, camera distance and head position. Where available, objective surface measurements can complement clinical grading. Assess whether a residual crease reflects skin texture, ongoing muscle activity or deeper structural change before proposing more treatment. [1]
Agree on the next step
Discuss what improved, what remains and whether the original goal was met. An incomplete response should trigger reassessment of the wrinkle driver. Further microneedling, a different approach or no further procedure may be appropriate; individual outcomes vary. [1,4,5]
Document visible change under consistent conditions.


Image for illustrative purposes only. Courtesy of amiea med.
Lines and skin surface appearance
Individual outcomes vary. Use the same expression, lighting, camera distance and head position when documenting change. Assess line severity, skin texture and laxity separately; this image pair is illustrative.


Image for illustrative purposes only. Courtesy of Dr. Dorota Kowalczyk, MD, specialist of aesthetic medicine. With the use of exosomes from probiotic bacteria.
Ageing-Skin Laxity and Texture
In the EXCEED study skin laxity improved in 97.9% and skin texture in 100% of subjects at Days 90 and 150.
Plan facial wrinkle treatments with confidence.
Explore professional training and amiea med device options for your market. Match your treatment plan to the current regional indication and Instructions for Use. This professional guide supports clinical planning and does not replace patient-specific assessment.
Scientific references
Safety and Effectiveness of an Automated Microneedling Device
[1] Ablon G. Safety and Effectiveness of an Automated Microneedling Device in Improving the Signs of Aging Skin. J Clin Aesthet Dermatol. 2018;11(8):29–34. PMID 30214664; PMCID PMC6122507.
Summary: Exceed Microneedling Device
[2] U.S. Food and Drug Administration. K180778 510(k) Summary: Exceed Microneedling Device. September 7, 2018.
Microneedling Devices. Risks and information.
[3] U.S. Food and Drug Administration. Microneedling Devices. Risks and information for healthcare providers.
Botulinum toxin therapy
[4] American Academy of Dermatology. Botulinum toxin therapy: FAQs.
Wrinkles. Treatment options and professional assessment.
[5] American Academy of Dermatology. Wrinkles. Treatment options and professional assessment.